
You can add a landmark by drawing a new one from the Landmarks tab or from a dropped pin on the map.
Draw a New Landmark
Drawing a landmark allows you to visually specify the borders on the map surface.
To draw a new landmark:
- From the menu, click Landmarks.
- Click Add Landmark.
A default circle appears on the center of the map. The circle has four sizing handles on the perimeter and one moving handle in the center.
- Enter a label for the landmark.
- Choose the shape of the landmark (Circle or Polygon):
- Circle – Re-size the radius by dragging-and-dropping one of the four sizing handles on the perimeter. (Alternatively, you can enter a custom radius in feet, miles, meters, or kilometers.) Move the circle by dragging-and-dropping the moving node. (Alternatively, you can enter a custom Lat/Lng.)
- Polygon – Click on the map to start drawing a polygon shape. Drag and drop the sizing handles as needed.
- Choose a Color.
Colors can help you categorize or group landmarks (e.g., set all customer sites to light orange).
- Click Save.
Create a Landmark from a Pin
A dropped pin marks a temporary location based on a visual reference or an address/lat/lon. Creating a landmark from a dropped pin allows you to reuse that location again.
To create a landmark from a pin:
- From the Map Toolbar, click Drop a Pin (
 ).
). - Drag-and-drop the pin to the location from which you want to create a landmark.
- Click Landmark.
A default circle appears on the center of the map. The circle has four sizing handles on the perimeter and one moving handle in the center.
- Enter a label for the landmark.
- Choose the shape of the landmark (Circle or Polygon):
- Circle – Re-size the radius by dragging-and-dropping one of the four sizing handles on the perimeter. (Alternatively, you can enter a custom radius in feet, miles, meters, or kilometers.) Move the circle by dragging-and-dropping the moving node. (Alternatively, you can enter a custom Lat/Lng.)
- Polygon – Click on the map to start drawing a polygon shape. Drag and drop the sizing handles as needed.
- Choose a Color.
Colors can help you categorize or group landmarks (e.g., set all customer sites to light orange).
- Click Save.
Create a Landmark from a Report
Any report that shows a location includes the ability to view an interactive map from the location and/or to add a landmark from the location.
To create a landmark from a report:
- Next to a Location line item on a report, click the plus icon (
 ).
).
The Landmark Editor opens in a new browser tab. The location selected from the report is shown on the map based on the Latitude and Longitude coordinates. The default landmark shape is a circle.
- Add a Label for the landmark, and click Save.
The landmark is now available to use in relevant areas of the portal.
- Return to the report, and Refresh the browser tab (F5).
The name of the landmark replaces the physical address on any relevant location line items.
You can create landmarks by manually entering addresses into the web portal one at a time, clicking on points from web maps or reports, importing addresses from a spreadsheet, importing the KML coordinates from Google Earth, sending an SMS message via Query Services, or clicking on a point from a map in the mobile app.
Enter Landmark Locations
Entering landmark information manually is often used when you have a small number of landmarks (1-5) to add at a time.
Example
The owner at Company XYZ wants an easy way to identify the headquarters building whenever its address appears on reports. For dispatching purposes, he also wants to easily find out which of his vehicles is closest to headquarters at any given time.
To enter a new landmark location:
- From the portal, hover over the Mapping menu, click Edit Landmarks, and click Open.
The Edit Landmarks page opens in a new browser tab.
- In the Go To Address box, enter a physical address or latitude/longitude coordinates, and click Go To Address. Alternatively, you can zoom in on the map and move map pointer (
 ) to the location you want to isolate.
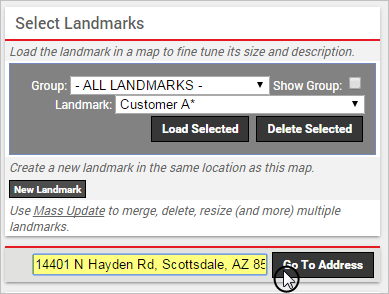
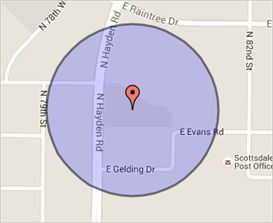
The address and latitude/longitude coordinates are updated in the landmark details. The location also appears on the map with a default landmark boundary (circle).
To manually create your own landmark boundaries for the location, choose from the circle or polygon shape icons on the map. ![]() Satellite view or Street view (
Satellite view or Street view ( ) can also help you define more precise boundaries.
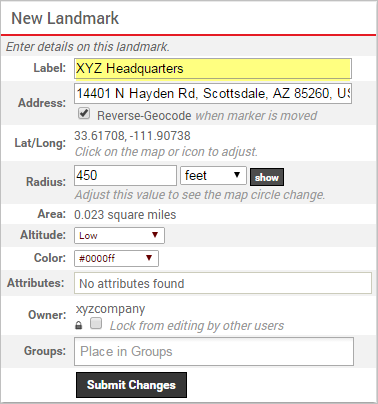
- Set the different properties for the landmark:
- Label: Enter the user-friendly identifier for the landmark (e.g., Headquarters). If the landmark shape is a polygon, the label will be denoted with an asterisk (*).
- Address: Enter the physical address of the location you want to target. If you chose to “Go To Address,” it should automatically be populated.
- Reverse-Geocode: When selected, the address will automatically adjust if you choose to drag the map pointer to a different location. You may want to clear this check box if the address is correct, but you want to move the map pointer slightly.
- Lat/Long: Displays the latitude and longitude coordinates for the selected location.
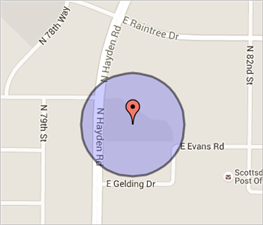
- Radius: By default, the landmark boundary for a circle is 750 feet. To narrow or expand the boundary border, adjust the radius value. In the Company XYZ example, we changed the radius to 450 feet to make the area smaller.
- Area: Displays the square miles for the selected landmark area.
- Altitude: Click the drop-down to choose an altitude value (Unspecified, Low, Medium, High). This value determines how tall the landmark appears in 3D maps.
- Color: Click the drop-down to choose a different color for the selected landmark area.
- Attributes: Choose the attributes to apply to this landmark. (Available for Enterprise.)
- Owner: If available, choose which portal user owns this landmark. Each portal user who creates landmarks has a system group called, “Landmarks by [username].”
- Edit Lock: Select the box to prevent other portal users from editing the landmark properties.
- Groups: In addition to the system group called “Landmarks by [username],” choose the landmark groups in which to include this landmark.
Alerts are only generated for Landmarks with an area smaller than a 10,000-foot radius. Landmarks exceeding this size will be excluded from alert generation. Please review your Landmark sizes to ensure critical locations are within the alerting threshold.
- Click Save Landmark.
Any relevant system groups (i.e., “Landmarks by [username]”) are populated in the Groups box. The landmark is now available to use on maps, reports, and dashlets.
Create a Landmark from a Map
Rather than start with a known address, you can create landmarks directly from vehicle locations on current and history maps.
ExampleThe owner at Company XYZ is viewing a map for the current location of his Service vehicles, and he noticed that one of his vehicles is at a new customer address that hasn’t yet been added as a landmark.
To create a landmark from a map:
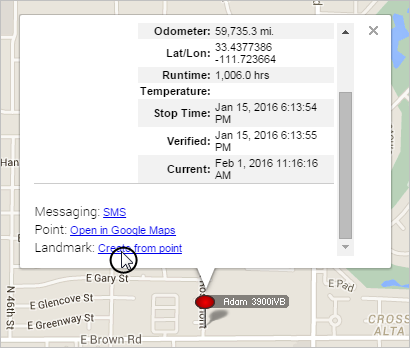
- From a map dashlet or window, click the point at which you want to create a landmark.
- From the pop-up window, click Create from point (landmark).
The Edit Landmarks page opens in a new browser tab.
- Add a label for the landmark (e.g., Customer ABC), modify other properties as needed (see above), and click Save Landmark.
The landmark is now available to use on maps, reports, and dashlets.
Create a Landmark from a Report
Rather than start with a known address, you can create landmarks directly from vehicle locations on reports.
ExampleThe owner at Company XYZ notices a non-business location that appears frequently on his reports. After reviewing the interactive map for the address, he realizes that it’s the home address of one of his drivers. He wants to run a history report to find out how many times any of his fleet vehicles has visited that landmark in the last 30 days.
To create a landmark from a report:
- From a report window, locate the address you want to create as a landmark.
- Click Create landmark from this point (plus icon
 ).
).

The Edit Landmarks page opens in a new browser tab.
- Add a label for the landmark (e.g., Sally’s House), modify other properties as needed (see above), and click Save Landmark.
The landmark is now available to use on maps, reports, and dashlets. In the Company XYZ example, the owner can run the Landmark History Report using the landmark: 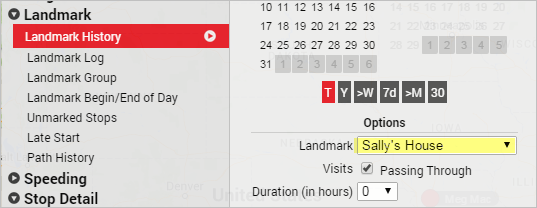
Import Landmarks from a Spreadsheet
The portal provides several options for importing and exporting data to and from a spreadsheet. You can use the import option for adding a large batch of landmarks. The maximum number of rows spreadsheet upload accepts is 1,500. If your spreadsheet has more than this number it is recommended to break it up and perform multiple uploads for each group of 1,500 until it is complete.
If you already have data in the portal, it’s a good practice to first export the data for safe-keeping so that you can restore if you later make a mistake in your import.
To add new landmarks by importing from a spreadsheet:
- From the portal, hover over the Mapping menu, click Spreadsheet Import/Export, and click Open.
- Download a CSV Example template (1 or 2).
- Within the spreadsheet, column names appear in Row 1 and an example record appears in Row 2. Replace Row 2+ with your own data.
Fields in the Reference column on the Update/Export page are required. If your spreadsheet has duplicate data rows for a reference column, such as two rows with the same landmark name, the spreadsheet upload will only import one record using the last row of data.
Available columns for landmark import include: Longitude, Latitude, Landmark Name, Address, City, State, and Zip. You must include data for the following cells: Name (reference column) and Address (required unless you input Latitude and Longitude).
Address values should include house number, street, city, state, zip code, and country. In lieu of a single “Address” column, you can optionally add separate columns for each piece of the address. Radius values can be in feet, miles, or meters. (You’ll specify during the import.) If you have multiple items within a cell, use the following delineator(s):
: – multiple assignments (e.g., Vehicles:Drivers)
; – multiple items (e.g., red;gray)
- Click File > Save.
- From the portal, hover over the Mapping menu, click Spreadsheet Import/Export, and click Open.
- From the Import Step 1: Upload CSV or Excel File grid, click Choose File.
- In the Open window, browse to the location where you saved the file for import, and double-click it.
- Click Upload Now.
The Import Step 2: Define Columns grid appears. This grid allows you to see how your spreadsheet column names will be applied to the appropriate fields in the GPS Insight portal. Set any fields marked “IGNORE” to the appropriate column name.
If a landmark name from your spreadsheet matches the name of an existing landmark in your account, you have three options: Skip (do not import the duplicate), Alter (automatically add an ordered numeral to the duplicate), or Update (overwrite the existing landmark properties with the duplicate). The default is “Alter.”
- Click Preview the Import.
The Import Step 3: Preview Import Data grid appears. This grid allows you to verify the data that will be imported. Latitude and longitude values are automatically added for addresses. Some addresses may not be found if you used only latitude and longitude values in the spreadsheet.
- Choose the group options for the import, and click Proceed with Import.
The landmarks will automatically be included in the system group, “Landmarks by [username].”
The Import Step 4: Import All Data grid appears. This grid provides a summary of the import results. If any rows were skipped, they will be listed here with the reason they were not imported.
- From the top of the screen, click Mass Update to view the new landmarks that were imported. (Filter by group.)
If you are importing a large group of landmarks, the process may take some time before the auto sync mechanism runs. If your import is time-sensitive, contact Support to request a manual sync to expedite this process.
Importing Landmarks from Google Earth
Google Earth uses Keyhole Markup Language (KML) to express geographic visualizations. GPS Insight supports import of KML (in XML notation) into the portal by way of copy and paste. See more use cases for this feature on our Executive Blog.
Example
Company XYZ uses Google Earth to identify all of its dispatch facilities. XYZ’s owner wants to import all landmarks from Google Earth into the portal.
To create and import landmarks from Google Earth:
- Within Google Earth, locate the area that you want to import into the portal.
- Click the Polygon tool.
![]()
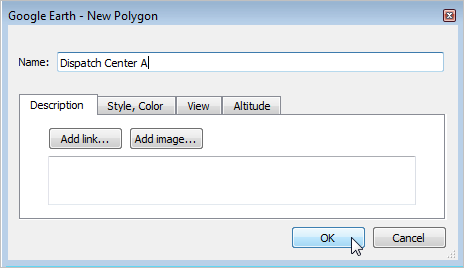
The Google Earth – New Polygon screen appears. (Leave this dialog open.)
- On the map, click the points around the area you want to mark.
- From the Google Earth – New Polygon screen, enter a name for the landmark, and click OK.
You can continue to create landmarks in Google Earth as needed. When you are ready to import the landmark(s) into the portal, proceed with the steps below.
- From the Places pane in Google Earth, right-click the landmark (if individual) or the folder of landmarks (if multiple) that you want to import, and click Copy. The XML for the selected area is copied to your clipboard.
You can also right-click the selected area on the map (white space) to copy the XML of an individual landmark.
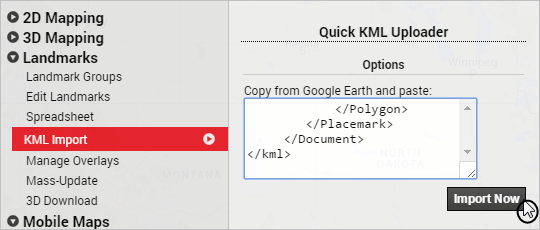
- Toggle to the portal. Hover over the Mapping menu, and click KML Import.
- In the Quick KML Uploader box, paste the contents of your clipboard (CTRL + V).
- Click Import Now.
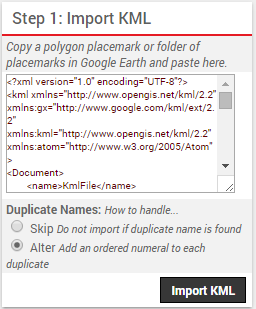
The Import KML Polygons page appears.
- From the Step 1: Import KML grid, specify your preference for handling duplicate landmark names.
If a landmark name from the XML matches the name of an existing landmark in your account, you have two options: Skip (do not import the duplicate) or Alter (automatically add an ordered numeral to the duplicate). The default is “Alter.”
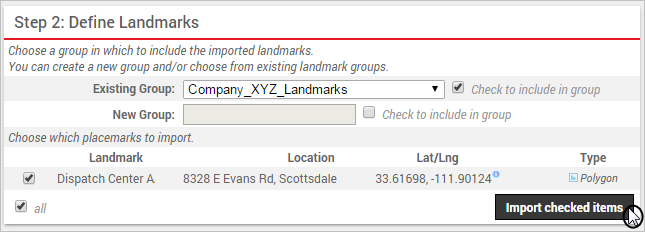
- From the Step 2: Define Landmarks grid, set your preferences for the following:
- Existing Group: Add the imported landmarks to an existing group (select check box).
- New Group: Add the imported landmarks to a new group (specify name and select check box).
- Landmark: Select the check box(es) of the landmark(s) that you want to import.
- Click Import checked items.
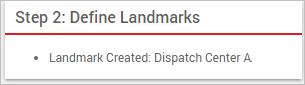
A success message indicates what landmarks were created and what landmark groups (if any).
You can create landmarks by manually entering addresses into the web portal one at a time, clicking on points from web maps or reports, importing addresses from a spreadsheet, importing the KML coordinates from Google Earth, sending an SMS message via Query Services, or clicking on a point from a map in the mobile app.
Enter Landmark Locations
Entering landmark information manually is often used when you have a small number of landmarks (1-5) to add at a time.
Example
The owner at Company XYZ wants an easy way to identify the headquarters building whenever its address appears on reports. For dispatching purposes, he also wants to easily find out which of his vehicles is closest to headquarters at any given time.
To enter a new landmark location:
- From the portal, hover over the Mapping menu, click Edit Landmarks, and click Open.
The Edit Landmarks page opens in a new browser tab.
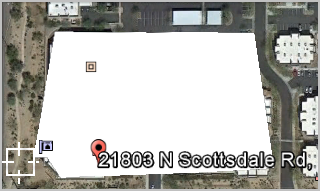
- In the Go To Address box, enter a physical address or latitude/longitude coordinates, and click Go To Address. Alternatively, you can zoom in on the map and move map pointer () to the location you want to isolate.
The address and latitude/longitude coordinates are updated in the landmark details. The location also appears on the map with a default landmark boundary (circle).
To manually create your own landmark boundaries for the location, choose from the circle or polygon shape icons on the map. ![]() Satellite view or Street view () can also help you define more precise boundaries.
Satellite view or Street view () can also help you define more precise boundaries.
- Set the different properties for the landmark:
- Label: Enter the user-friendly identifier for the landmark (e.g., Headquarters). If the landmark shape is a polygon, the label will be denoted with an asterisk (*).
- Address: Enter the physical address of the location you want to target. If you chose to “Go To Address,” it should automatically be populated.
- Reverse-Geocode: When selected, the address will automatically adjust if you choose to drag the map pointer to a different location. You may want to clear this check box if the address is correct, but you want to move the map pointer slightly.
- Lat/Long: Displays the latitude and longitude coordinates for the selected location.
- Radius: By default, the landmark boundary for a circle is 750 feet. To narrow or expand the boundary border, adjust the radius value. In the Company XYZ example, we changed the radius to 450 feet to make the area smaller.
- Area: Displays the square miles for the selected landmark area.
- Altitude: Click the drop-down to choose an altitude value (Unspecified, Low, Medium, High). This value determines how tall the landmark appears in 3D maps.
- Color: Click the drop-down to choose a different color for the selected landmark area.
- Attributes: Choose the attributes to apply to this landmark. (Available for Enterprise.)
- Owner: If available, choose which portal user owns this landmark. Each portal user who creates landmarks has a system group called, “Landmarks by [username].”
- Edit Lock: Select the box to prevent other portal users from editing the landmark properties.
- Groups: In addition to the system group called “Landmarks by [username],” choose the landmark groups in which to include this landmark.
Alerts are only generated for Landmarks with an area smaller than a 10,000-foot radius. Landmarks exceeding this size will be excluded from alert generation. Please review your Landmark sizes to ensure critical locations are within the alerting threshold.
- Click Save Landmark.
Any relevant system groups (i.e., “Landmarks by [username]”) are populated in the Groups box. The landmark is now available to use on maps, reports, and dashlets.
Create a Landmark from a Map
Rather than start with a known address, you can create landmarks directly from vehicle locations on current and history maps.
ExampleThe owner at Company XYZ is viewing a map for the current location of his Service vehicles, and he noticed that one of his vehicles is at a new customer address that hasn’t yet been added as a landmark.
To create a landmark from a map:
- From a map dashlet or window, click the point at which you want to create a landmark.
- From the pop-up window, click Create from point (landmark).
The Edit Landmarks page opens in a new browser tab.
- Add a label for the landmark (e.g., Customer ABC), modify other properties as needed (see above), and click Save Landmark.
The landmark is now available to use on maps, reports, and dashlets.
Create a Landmark from a Report
Rather than start with a known address, you can create landmarks directly from vehicle locations on reports.
ExampleThe owner at Company XYZ notices a non-business location that appears frequently on his reports. After reviewing the interactive map for the address, he realizes that it’s the home address of one of his drivers. He wants to run a history report to find out how many times any of his fleet vehicles have visited that landmark in the last 30 days.
To create a landmark from a report:
- From a report window, locate the address you want to create as a landmark.
- Click Create landmark from this point (plus icon ).
The Edit Landmarks page opens in a new browser tab.
- Add a label for the landmark (e.g., Sally’s House), modify other properties as needed (see above), and click Save Landmark.
The landmark is now available to use on maps, reports, and dashlets. In the Company XYZ example, the owner can run the Landmark History Report using the landmark:
Import Landmarks from a Spreadsheet
The portal provides several options for importing and exporting data to and from a spreadsheet. You can use the import option for adding a large batch of landmarks. The maximum number of rows spreadsheet upload accepts is 1,500. If your spreadsheet has more than this number it is recommended to break it up and perform multiple uploads for each group of 1,500 until it is complete.
If you already have data in the portal, it’s a good practice to first export the data for safe-keeping so that you can restore if you later make a mistake in your import.
To add new landmarks by importing from a spreadsheet:
- From the portal, hover over the Mapping menu, click Spreadsheet Import/Export, and click Open.
- Download a CSV Example template (1 or 2).
- Within the spreadsheet, column names appear in Row 1 and an example record appears in Row 2. Replace Row 2+ with your own data.
Fields in the Reference column on the Update/Export page are required. If your spreadsheet has duplicate data rows for a reference column, such as two rows with the same landmark name, the spreadsheet upload will only import one record using the last row of data.
Available columns for landmark import include: Longitude, Latitude, Landmark Name, Address, City, State, and Zip. You must include data for the following cells: Name (reference column) and Address (required unless you input Latitude and Longitude).
Address values should include house number, street, city, state, zip code, and country. In lieu of a single “Address” column, you can optionally add separate columns for each piece of the address. Radius values can be in feet, miles, or meters. (You’ll specify during the import.) If you have multiple items within a cell, use the following delineator(s):
~ – full path for hierarchy (e.g., Company Name~East~Northeast)
: – multiple assignments (e.g., Vehicles:Drivers)
; – multiple items (e.g., red;gray)
- Click File > Save.
- From the portal, hover over the Mapping menu, click Spreadsheet Import/Export, and click Open.
- From the Import Step 1: Upload CSV or Excel File grid, click Choose File.
- In the Open window, browse to the location where you saved the file for import, and double-click it.
- Click Upload Now.
The Import Step 2: Define Columns grid appears. This grid allows you to see how your spreadsheet column names will be applied to the appropriate fields in the GPS Insight portal. Set any fields marked “IGNORE” to the appropriate column name.
If a landmark name from your spreadsheet matches the name of an existing landmark in your account, you have three options: Skip (do not import the duplicate), Alter (automatically add an ordered numeral to the duplicate), or Update (overwrite the existing landmark properties with the duplicate). The default is “Alter.”
- Click Preview the Import.
The Import Step 3: Preview Import Data grid appears. This grid allows you to verify the data that will be imported. Latitude and longitude values are automatically added for addresses. Some addresses may not be found if you used only latitude and longitude values in the spreadsheet.
- Choose the group options for the import, and click Proceed with Import.
The landmarks will automatically be included in the system group, “Landmarks by [username].”
The Import Step 4: Import All Data grid appears. This grid provides a summary of the import results. If any rows were skipped, they will be listed here with the reason they were not imported.
- From the top of the screen, click Mass Update to view the new landmarks that were imported. (Filter by group.)
If you are importing a large group of landmarks, the process may take some time before the auto sync mechanism runs. If your import is time-sensitive, contact Support to request a manual sync to expedite this process.
Importing Landmarks from Google Earth
Google Earth uses Keyhole Markup Language (KML) to express geographic visualizations. GPS Insight supports import of KML (in XML notation) into the portal by way of copy and paste. See more use cases for this feature on our Executive Blog.
Example
Company XYZ uses Google Earth to identify all of its dispatch facilities. XYZ’s owner wants to import all landmarks from Google Earth into the portal.
To create and import landmarks from Google Earth:
- Within Google Earth, locate the area that you want to import into the portal.
- Click the Polygon tool.
![]()
The Google Earth – New Polygon screen appears. (Leave this dialog open.)
- On the map, click the points around the area you want to mark.
- From the Google Earth – New Polygon screen, enter a name for the landmark, and click OK.
You can continue to create landmarks in Google Earth as needed. When you are ready to import the landmark(s) into the portal, proceed with the steps below.
- From the Places pane in Google Earth, right-click the landmark (if individual) or the folder of landmarks (if multiple) that you want to import, and click Copy. The XML for the selected area is copied to your clipboard.
You can also right-click the selected area on the map (white space) to copy the XML of an individual landmark.
- Toggle to the portal. Hover over the Mapping menu, and click KML Import.
- In the Quick KML Uploader box, paste the contents of your clipboard (CTRL + V).
- Click Import Now.
The Import KML Polygons page appears.
- From the Step 1: Import KML grid, specify your preference for handling duplicate landmark names.
If a landmark name from the XML matches the name of an existing landmark in your account, you have two options: Skip (do not import the duplicate) or Alter (automatically add an ordered numeral to the duplicate). The default is “Alter.”
- From the Step 2: Define Landmarks grid, set your preferences for the following:
- Existing Group: Add the imported landmarks to an existing group (select check box).
- New Group: Add the imported landmarks to a new group (specify name and select check box).
- Landmark: Select the check box(es) of the landmark(s) that you want to import.
- Click Import checked items.
A success message indicates what landmarks were created and what landmark groups (if any).