
Please use the following information to troubleshoot the Driveri Hub-X.
If you would like additional information about the Driveri Hub-X, please refer to the Driveri Hub-X FAQ.
General Notes
- Units manually paired in the Driveri Portal cannot be unpaired using the installer app.
- OTA upgrades are now being implemented.
o Upgrades only happen when the vehicle exceeds 30mph.
o The upgrade process will take approximately 1 minute.
o If RMA is required, please contact Support.
Hardware Checks
The Driveri Hub-X, when fully wired and connected, will power on with an ignition-on event. To determine if the Driveri Hub-X is on, look for the 4 LEDs on the panel opposite to the cable connections.
4 LEDs
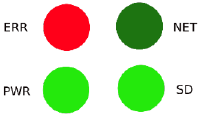
LED State & Description
The PWR and SD LEDs will glow green, and the ERR LED will blink red. This is normal operation.
ERR Red LED indicates device is recording and working properly when blinking.
| LED 1 | ERR | Red – Blink | Connected to Wi-Fi network |
|---|---|---|---|
| LED 2 | NET | No glow | Reserved for future use |
| LED 3 | PWR | Green – Solid | Device Power ON indicator |
| LED 4 | SD | Green – Solid | SD card installed |
| LED 5 | IR | No glow | Reserved for installers – IR activity while using remote |
Hub-X Storage
The storage information below is based on use of 720p external cameras.
| Driveri Camera | Storage Hours (Standalone Driveri) | 1 Ext Cam Storage (hr) | 2 Ext Cam Storage (hr) | 3 Ext Cam Storage (hr) | 4 Ext Cam Storage (hr) |
|---|---|---|---|---|---|
| D-430 (128GB) | Up to 100 | Up to 100 | Up to 100 | Up to 100 | Up to 100 |
| D-430 (256GB) | Up to 200 | Up to 200 | Up to 200 | Up to 200 | 150 |
| D-210 (128GB) | 100 | 100 | 100 | 100 | 100 |
| D-210 (256GB) | 200 | 200 | 200 | 200 | 150 |
| D-410 (128GB) | Up to 100 | Up to 100 | Up to 100 | Up to 100 | Up to 100 |
| D-410 (512GB) | 360 | 360 | 250 | 200 | 150 |
Troubleshooting
Driveri Hub-X Won’t Power On
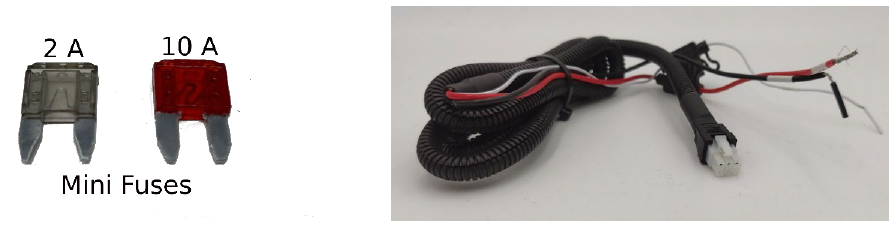
- Search for the burnt fuses inline with the power cables.
- Red line contains a 10A fuse.
- White line contains a 2A fuse.
- Check with a multimeter.
- Check the voltage out of circuit (utilizing the plug – ground).
- 12VDC on both sides, in circuit.
- Molex on Driveri Hub-X.
Only PWR LED is ON
- For the device to operate the key must be in the locked position.
- Next to the 4 LEDs, there is a keyhole. Check the position of this keyhole and verify that the indentation faces the “Locked” position.
- SD Card LED should turn on and ERR LED should blink red shortly after the key is turned to the Lock state.
ERR Red LED indicates the device is recoridng and working properly when blinking.

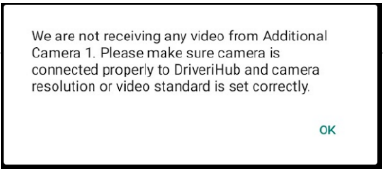
Pitch Black or Corrupted Stream Feeds
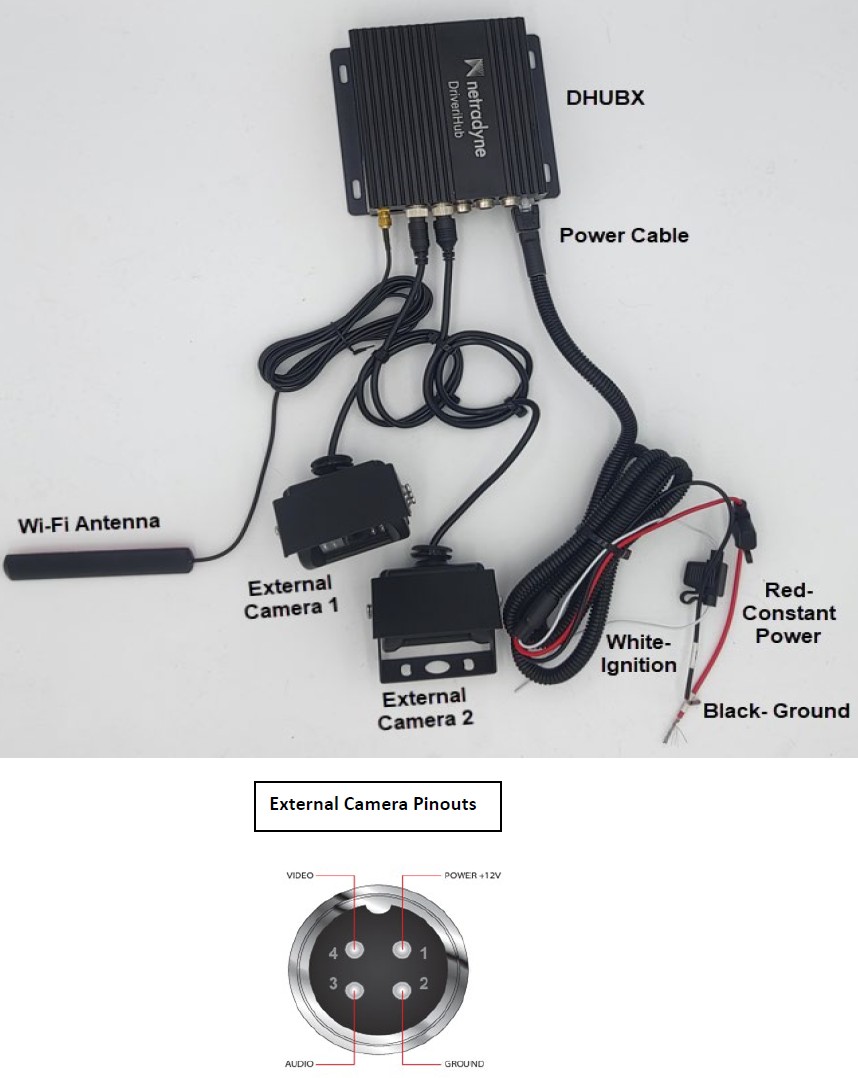
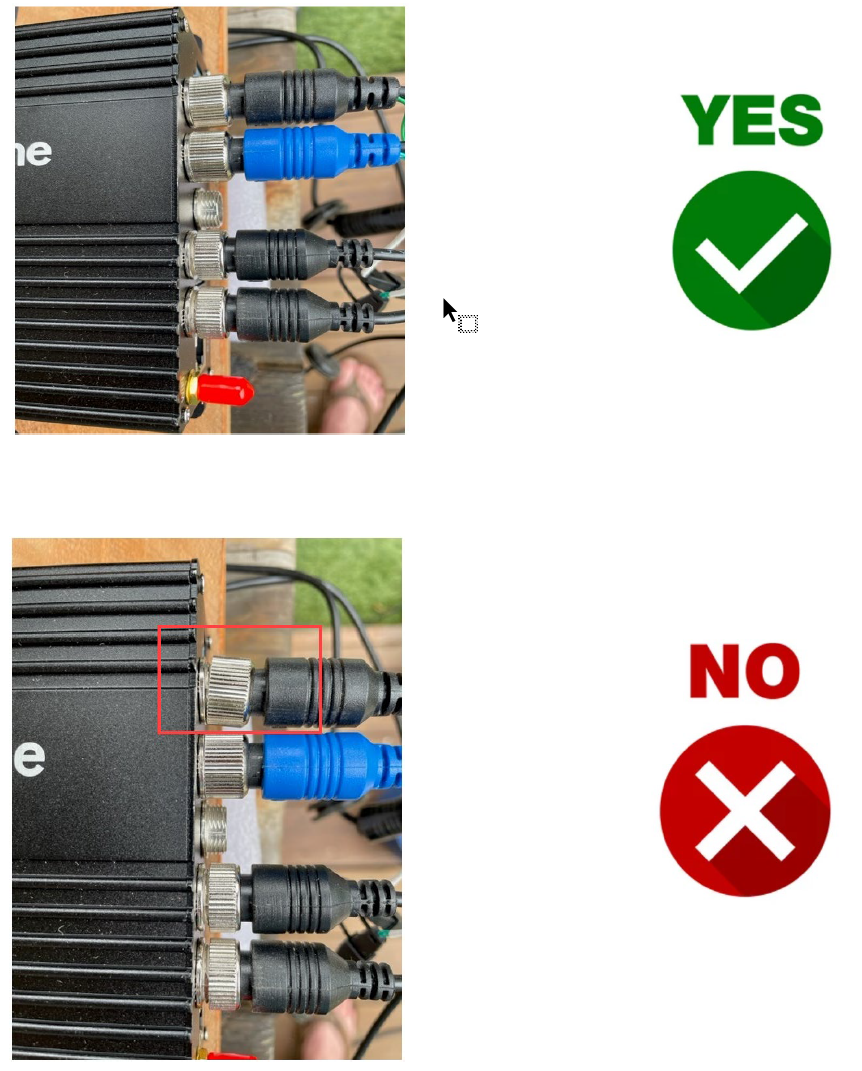
- Check the camera ports and secure the connections to the correct ports.
- Ports must match IDMS configuration.
- Check for proper seating, corrosion, or damage.
- Configure the video feed resolutions in the Installer App corresponding to the camera ports and types.
- You will see this warning every time you access a view on the Installer app, either you have the incorrect resolution setting or no camera attached.
- Check video communication protocol NTSC(USA) vs PAL(Europe) settings.
Only available on the Installer App.
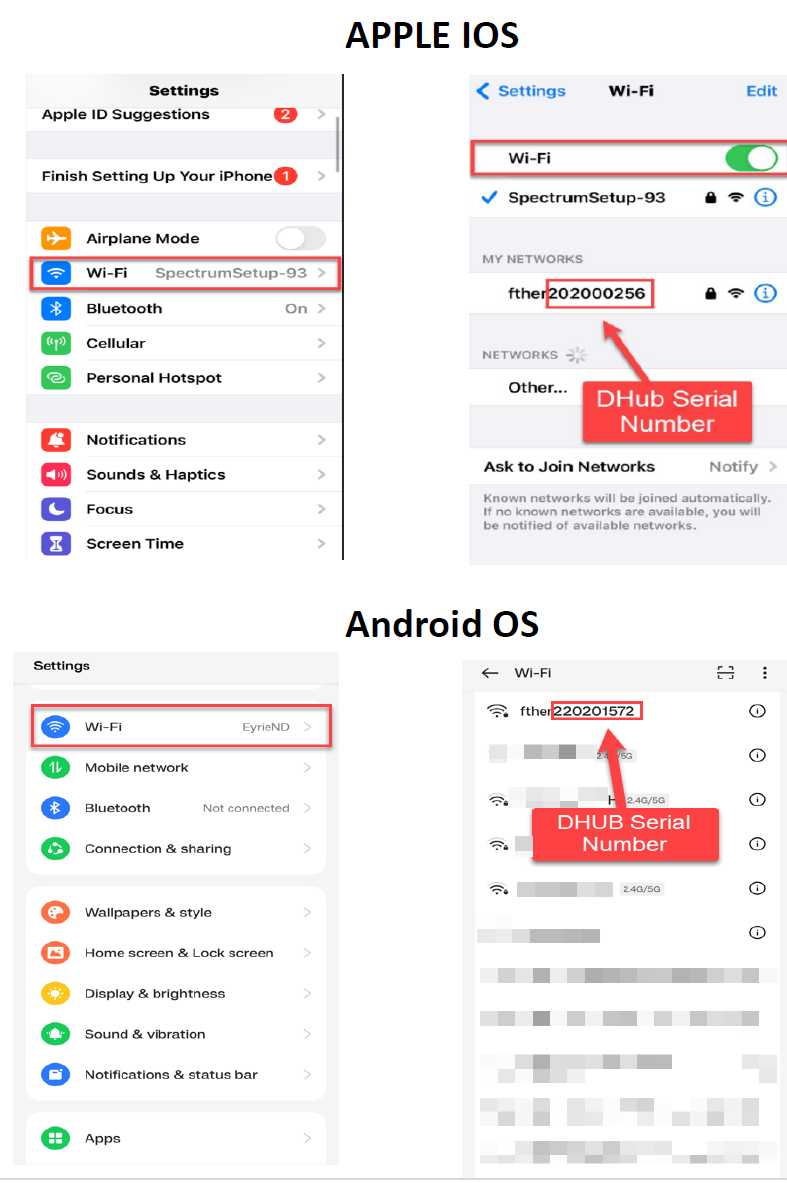
Locating Serial Number via Wi-Fi
If the identifying sticker is missing/unreadable/inaccessible, it can be found via Wi-Fi settings on your smart device.
- Ensure the Driveri Hub-X has been powered ON, then turn on the Wi-Fi on your smart device.
- On your smart device, navigate to Settings, then Wi-Fi.
You should see a network appear called “ftherXXXXXXXXX”. The numbers following “fther” is the serial number for the Driveri Hub-X device.
If you see more than one “ftherXXXXXXXXX” network appear then there are multiple Driveri Hub-Xs powered up nearby. Do not try to connect to the Wi-Fi of a different Driveri Hub-X device.
Difficulty Pairing the Driveri Hub-X with a Driveri Device
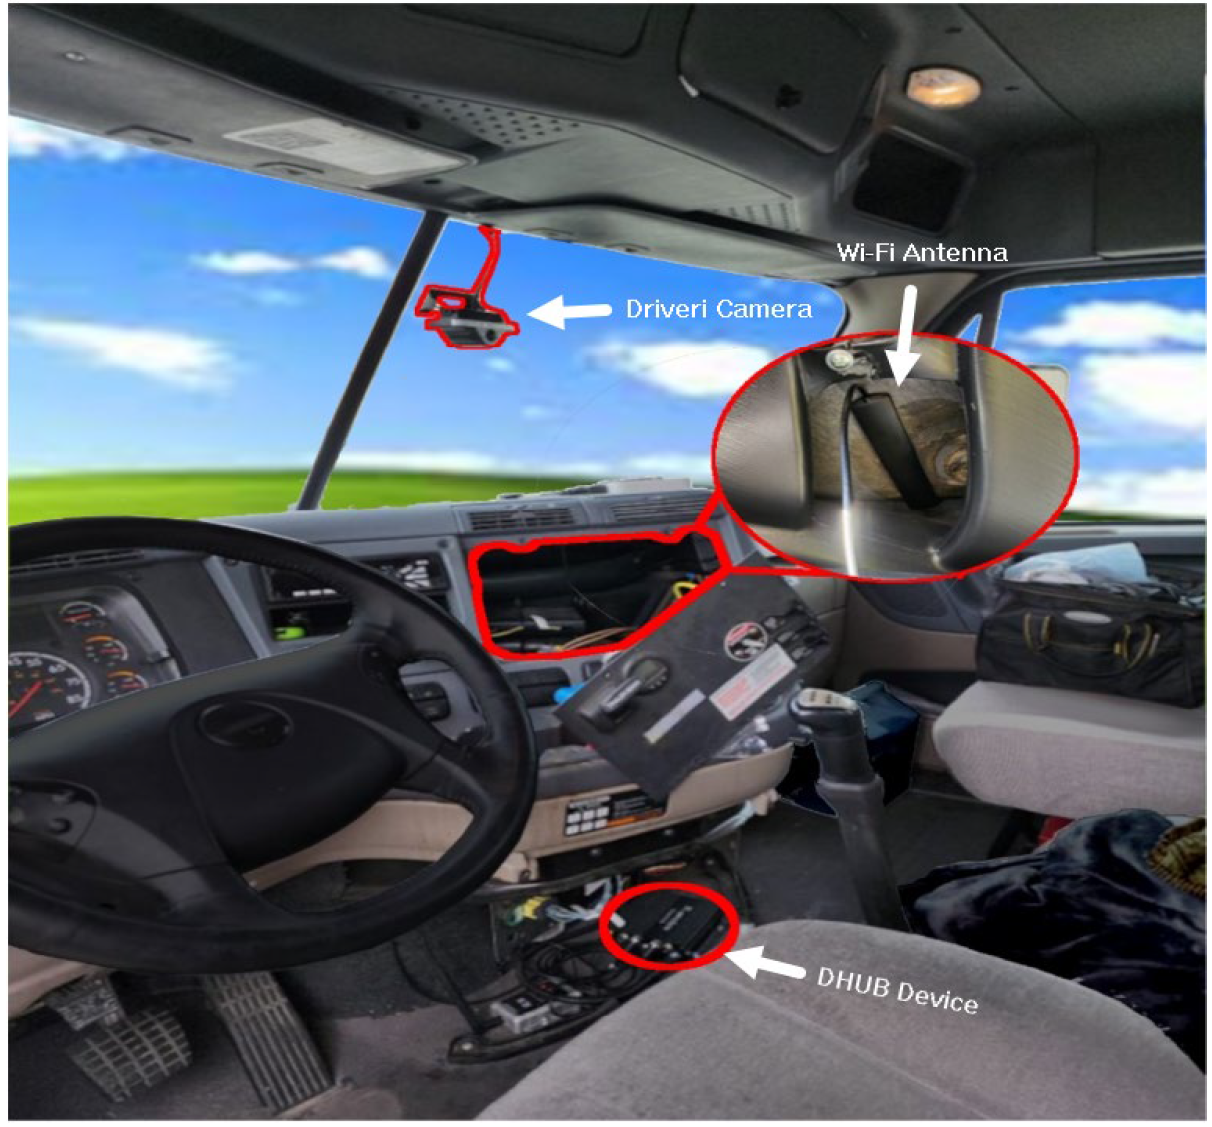
- Ensure that the Driveri Hub-X’s Wi-Fi antenna is connected and placed near the Driveri device and is not obstructed or blocked by any metallic surfaces.
- Check the proximity of the Driveri device to the Driveri Hub-X, if the device is too far or the antenna can’t reach the device, this can cause difficulty in retrieving videos.
In the example below the Driveri Hub-X Wi-Fi antenna has been located in close proximity to the Driveri device.
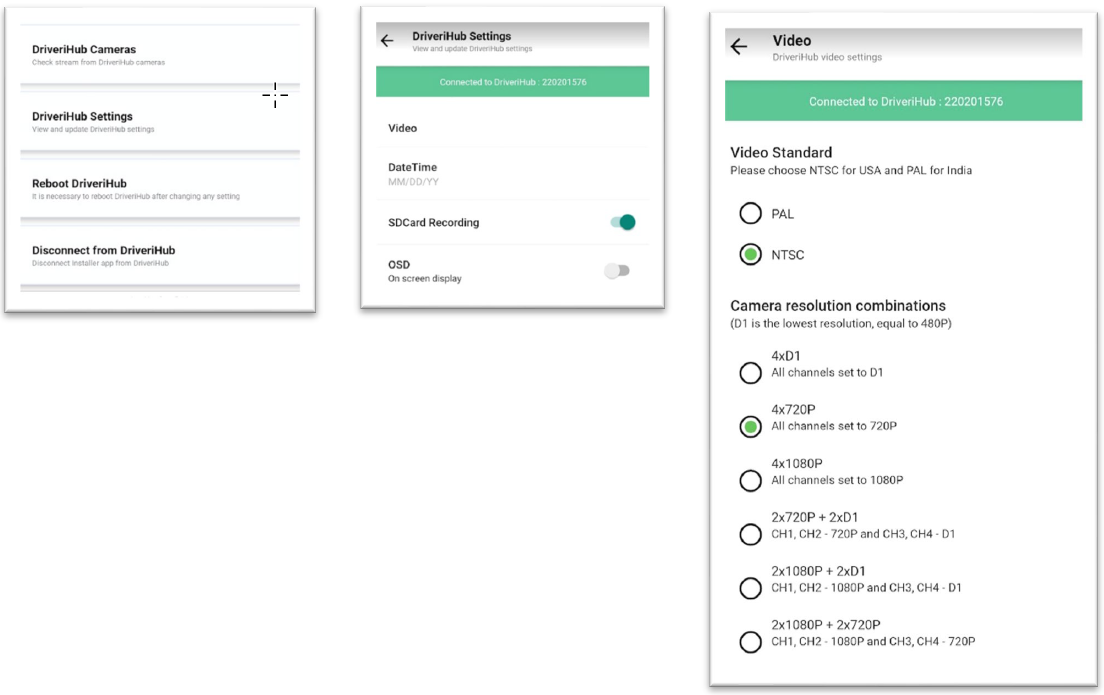
Needing to Change Resolution
If you need to change video resolution settings, please follow the below instructions.
- In the Installer App, log in to the Driveri Hub-X and select DriveriHub Settings.
- Select Video.
- Check video communication protocol NTSC(USA) vs PAL(Europe) settings.
- Under “Camera resolution combinations,” select the desired resolution.
Driveri Hub-X Connectivity Outline
Cable Connections
Camera Configuration Adjustments
Please refer to the following PDF for troubleshooting tips regarding camera configuration: Driveri HUB Camera Config Adjustments.