Array
(
[Fleet Tracking Portal] => Array
(
[Enterprise] => Array
(
[documentation] => Array
(
)
[video] => Array
(
)
[bestpractice] => Array
(
)
[deepdive] => Array
(
)
)
)
[Advanced Admin] => Array
(
[Enterprise] => Array
(
[documentation] => Array
(
[45] => Array
(
[posts] => WP_Query Object
(
[query] => Array
(
[orderby] => title
[order] => ASC
[post_type] => documentation
[posts_per_page] => 999
[tax_query] => Array
(
[0] => Array
(
[taxonomy] => feature
[field] => term_id
[terms] => 45
[include_children] => 1
)
[1] => Array
(
[taxonomy] => solution
[field] => term_id
[terms] => 12
)
[relation] => AND
[2] => Array
(
[taxonomy] => product
[field] => term_id
[terms] => 511
)
)
[meta_query] => Array
(
[0] => Array
(
[key] => _exclude_whitelabel_default
[compare] => NOT EXISTS
)
)
)
[query_vars] => Array
(
[orderby] => title
[order] => ASC
[post_type] => documentation
[posts_per_page] => 999
[tax_query] => Array
(
[0] => Array
(
[taxonomy] => feature
[field] => term_id
[terms] => 45
[include_children] => 1
)
[1] => Array
(
[taxonomy] => solution
[field] => term_id
[terms] => 12
)
[relation] => AND
[2] => Array
(
[taxonomy] => product
[field] => term_id
[terms] => 511
)
)
[meta_query] => Array
(
[0] => Array
(
[key] => _exclude_whitelabel_default
[compare] => NOT EXISTS
)
)
[error] =>
[m] =>
[p] => 0
[post_parent] =>
[subpost] =>
[subpost_id] =>
[attachment] =>
[attachment_id] => 0
[name] =>
[pagename] =>
[page_id] => 0
[second] =>
[minute] =>
[hour] =>
[day] => 0
[monthnum] => 0
[year] => 0
[w] => 0
[category_name] =>
[tag] =>
[cat] =>
[tag_id] =>
[author] =>
[author_name] =>
[feed] =>
[tb] =>
[paged] => 0
[meta_key] =>
[meta_value] =>
[preview] =>
[s] =>
[sentence] =>
[title] =>
[fields] => all
[menu_order] =>
[embed] =>
[category__in] => Array
(
)
[category__not_in] => Array
(
)
[category__and] => Array
(
)
[post__in] => Array
(
)
[post__not_in] => Array
(
[0] => 14750
[1] => 23436
[2] => 27424
[3] => 27817
[4] => 30225
[5] => 31065
[6] => 31175
[7] => 32017
[8] => 32296
[9] => 32565
[10] => 32605
[11] => 32636
[12] => 33723
[13] => 33737
[14] => 33761
[15] => 34344
[16] => 34459
[17] => 34553
[18] => 34586
[19] => 34590
[20] => 34651
[21] => 34657
[22] => 34659
)
[post_name__in] => Array
(
)
[tag__in] => Array
(
)
[tag__not_in] => Array
(
)
[tag__and] => Array
(
)
[tag_slug__in] => Array
(
)
[tag_slug__and] => Array
(
)
[post_parent__in] => Array
(
)
[post_parent__not_in] => Array
(
)
[author__in] => Array
(
)
[author__not_in] => Array
(
)
[search_columns] => Array
(
)
[ignore_sticky_posts] =>
[suppress_filters] =>
[cache_results] => 1
[update_post_term_cache] => 1
[update_menu_item_cache] =>
[lazy_load_term_meta] => 1
[update_post_meta_cache] => 1
[nopaging] =>
[comments_per_page] => 50
[no_found_rows] =>
[taxonomy] => feature
[term_id] => 45
)
[tax_query] => WP_Tax_Query Object
(
[queries] => Array
(
[0] => Array
(
[taxonomy] => feature
[terms] => Array
(
[0] => 45
)
[field] => term_id
[operator] => IN
[include_children] => 1
)
[1] => Array
(
[taxonomy] => solution
[terms] => Array
(
[0] => 12
)
[field] => term_id
[operator] => IN
[include_children] => 1
)
[relation] => AND
[2] => Array
(
[taxonomy] => product
[terms] => Array
(
[0] => 511
)
[field] => term_id
[operator] => IN
[include_children] => 1
)
)
[relation] => AND
[table_aliases:protected] => Array
(
[0] => wp_term_relationships
[1] => tt1
[2] => tt2
)
[queried_terms] => Array
(
[feature] => Array
(
[terms] => Array
(
[0] => 45
)
[field] => term_id
)
[solution] => Array
(
[terms] => Array
(
[0] => 12
)
[field] => term_id
)
[product] => Array
(
[terms] => Array
(
[0] => 511
)
[field] => term_id
)
)
[primary_table] => wp_posts
[primary_id_column] => ID
)
[meta_query] => WP_Meta_Query Object
(
[queries] => Array
(
[0] => Array
(
[key] => _exclude_whitelabel_default
[compare] => NOT EXISTS
)
[relation] => OR
)
[relation] => AND
[meta_table] => wp_postmeta
[meta_id_column] => post_id
[primary_table] => wp_posts
[primary_id_column] => ID
[table_aliases:protected] => Array
(
[0] => wp_postmeta
)
[clauses:protected] => Array
(
[wp_postmeta] => Array
(
[key] => _exclude_whitelabel_default
[compare] => NOT EXISTS
[compare_key] => =
[alias] => wp_postmeta
[cast] => CHAR
)
)
[has_or_relation:protected] =>
)
[date_query] =>
[request] => SELECT SQL_CALC_FOUND_ROWS wp_posts.ID
FROM wp_posts LEFT JOIN wp_term_relationships ON (wp_posts.ID = wp_term_relationships.object_id) LEFT JOIN wp_term_relationships AS tt1 ON (wp_posts.ID = tt1.object_id) LEFT JOIN wp_term_relationships AS tt2 ON (wp_posts.ID = tt2.object_id) LEFT JOIN wp_postmeta ON ( wp_posts.ID = wp_postmeta.post_id AND wp_postmeta.meta_key = '_exclude_whitelabel_default' )
WHERE 1=1 AND wp_posts.ID NOT IN (14750,23436,27424,27817,30225,31065,31175,32017,32296,32565,32605,32636,33723,33737,33761,34344,34459,34553,34586,34590,34651,34657,34659) AND (
wp_term_relationships.term_taxonomy_id IN (45)
AND
tt1.term_taxonomy_id IN (12)
AND
tt2.term_taxonomy_id IN (511)
) AND (
wp_postmeta.post_id IS NULL
) AND ((wp_posts.post_type = 'documentation' AND (wp_posts.post_status = 'publish' OR wp_posts.post_status = 'graded' OR wp_posts.post_status = 'not_graded')))
GROUP BY wp_posts.ID
ORDER BY wp_posts.post_title ASC
LIMIT 0, 999
[posts] => Array
(
[0] => WP_Post Object
(
[ID] => 937
[post_author] => 12
[post_date] => 2016-01-26 16:54:25
[post_date_gmt] => 2016-01-26 16:54:25
[post_content] => After you've registered vehicles within the [whitelabel_name] portal, you can optionally set up drivers and link them to certain vehicles within your fleet to enhance your reporting and messaging options. It's also a good practice to create driver groups if you plan to limit which users can see data for certain drivers.
You must have the Driver Admin permission enabled in the User Access List in order to manage users.
 [post_title] => About Drivers
[post_excerpt] => After you've registered vehicles within the portal, you can you can optionally set up drivers and link them to certain vehicles within your fleet to enhance your reporting and messaging options. It's also a good practice to create driver groups if you plan to limit which users can see data for certain drivers.
[post_status] => publish
[comment_status] => closed
[ping_status] => closed
[post_password] =>
[post_name] => about-drivers
[to_ping] =>
[pinged] =>
[post_modified] => 2019-06-05 12:48:19
[post_modified_gmt] => 2019-06-05 19:48:19
[post_content_filtered] =>
[post_parent] => 0
[guid] => http://gpsihelp.wpengine.com/?post_type=documentation&p=937
[menu_order] => 3
[post_type] => documentation
[post_mime_type] =>
[comment_count] => 0
[filter] => raw
)
[1] => WP_Post Object
(
[ID] => 938
[post_author] => 12
[post_date] => 2016-01-26 16:54:52
[post_date_gmt] => 2016-01-26 16:54:52
[post_content] => You can create or update drivers by entering information into the web portal one at a time, or you can manage drivers in a batch process by importing data from a spreadsheet.
Enter Driver Information
Entering drivers information manually is often used when you have a small number of drivers (1-5) to register at a time.
To enter information for a new driver:
- From the portal, hover over the Account menu, click Manage Drivers, and click Open.
The Manage Drivers and Groups page opens in a new browser tab.
- At the bottom of the Driver List grid, click Driver next to Create New.

- In the Add New Driver window, enter the driver details: First Name, Last Name, Reference ID, Timezone, Country, Email Address, Phone Number, and Alert Preference.

Reference ID allows you to optionally identify drivers by an ID that's understood at your company (e.g., employee ID). If you use Hours of Service, the Reference ID must match the driver's HOS ID. Timezone is used to accurately timestamp alerts received by the driver.
- Click Create Driver.
A message appears to indicate the driver was successfully saved. A new driver group, "Drivers for [your username]," was also automatically created. (Click the group name from the Driver Group List grid if you want to rename it.)
- Filter the Driver List grid using the new driver group to see the new driver.
Import Drivers
The portal provides several options for importing and exporting data to and from a spreadsheet. You can use the import option for registering a large batch of drivers.
If you already have data in the portal, it's a good practice to first export the data for safe-keeping so that you can restore if you later make a mistake in your import.
The maximum number of rows spreadsheet upload accepts is 1,500. If your spreadsheet has more than this number it is recommended to break it up and perform multiple uploads for each group of 1,500 until it is complete.
To add new drivers by importing from a spreadsheet:
- From the portal, hover over the Account menu, click Manage Drivers, and click Update/Export items using a spreadsheet.
- Download one of the CSV Example templates (1, 2, or 3) next to the Create New users spreadsheet action.
- Within the spreadsheet, column names appear in Row 1 and an example record appears in Row 2. Replace Row 2+ with your own data.
Fields in the Reference column on the Update/Export page are required. If your spreadsheet has duplicate data rows for a reference column, such as two rows with the same driver ID, the spreadsheet upload will only import one record using the last row of data.
Available columns for driver import include: Driver Full Name OR Last Name OR Reference ID, Reference ID Update, First Name, Timezone, Email Address, Phone Number, Alert Preferences, Driver ID, Driver Group.
Driver ID refers to the identifier on a DriverID keyfob (if used). Driver Group refers to the driver group(s) to which the driver belongs. If you have multiple items within a cell, use the following delineator(s):
~ - full path for hierarchy (e.g., Company Name~East~Northeast)
: - multiple assignments (e.g., Vehicles:Drivers)
; - multiple items (e.g., red;gray)
- Click File > Save.
- From the portal in the Spreadsheet Actions grid, click the Create Drivers option.
- From the Import Step 1: Upload CSV or Excel File grid, click Choose File.
- In the Open window, browse to the location where you saved the file for import, and double-click it.
- Click Upload Now.
The Import Step 2: Define Columns grid appears. This grid allows you to see how your spreadsheet column names will be applied to the appropriate fields in the portal. Set any fields marked "IGNORE" to the appropriate column name.
- Click Preview the Import.
The Import Step 3: Preview Import Data grid appears. This grid allows you to verify the data that will be imported. Valid values for reference fields will be marked with a green check box.
- Click Proceed with Import.
The Import Step 4: Import All Data grid appears. This grid provides a summary of the import results. If any rows were skipped, they will be listed here with the reason they were not imported.
- From the menu at the top of the page, click Drivers to view the new drivers that were imported.
Certain Spreadsheet Upload Actions can update only one column at a time. For example, the Attribute Update process would need to be performed twice to update the Car Color then the Car Type attribute. You would choose "–Ignore--" for one of the attributes during each upload so only one was chosen. (That the column header on that particular spreadsheet is the actual Attribute Name as entered in the system. This name must be listed in the first row to designate the Attribute Name for Attribute update.) The Hierarchy Update the spreadsheet process is similar in that you would perform it twice to assign a vehicle to two different Hierarchy Trees.
[post_title] => Adding a Driver
[post_excerpt] => You can create or update drivers by entering information into the web portal one at a time, or you can manage drivers in a batch process by importing data from a spreadsheet.
[post_status] => publish
[comment_status] => closed
[ping_status] => closed
[post_password] =>
[post_name] => adding-a-driver
[to_ping] =>
[pinged] =>
[post_modified] => 2019-06-05 12:48:24
[post_modified_gmt] => 2019-06-05 19:48:24
[post_content_filtered] =>
[post_parent] => 937
[guid] => http://gpsihelp.wpengine.com/?post_type=documentation&p=938
[menu_order] => 1
[post_type] => documentation
[post_mime_type] =>
[comment_count] => 0
[filter] => raw
)
[2] => WP_Post Object
(
[ID] => 940
[post_author] => 12
[post_date] => 2016-01-26 16:55:41
[post_date_gmt] => 2016-01-26 16:55:41
[post_content] => After you create a new driver within the portal, you may want to assign that driver to a specific vehicle. Driver assignment allows you to view driver history.
You can also view driver information on reports and maps, as well as send messages using alerts, or SMS Messaging.
Assign Drivers to Vehicles
There are several ways to assign a driver to a vehicle:
- Manual assignment using the portal interface
- Batch assignment using the portal interface upload
- Sending an SMS text message with assignment request (requires authentication)
- Touching a driver keyfob to a reader in the vehicle (requires installation)
- Implementing a custom API
- Assignment using the GPS Insight Manager App (iOS | Android)
- Assignment using the GPS Insight Driver App (iOS | Android)
- Assignment push via Driveri Visual Login System (VLS)
A driver may be assigned to one vehicle at a time. A new assignment to a vehicle cancels the previous assignment.
Manual Driver Assignment
Assigning drivers to vehicles manually is often used when you have a small number of assignments (1-5) at a time.
To assign a driver to a vehicle using the portal interface:
- From the portal, hover over the Account menu, click Manage Drivers, and click Open.
The Manage Drivers and Groups page opens in a new browser tab.
- From the Driver List grid, locate the driver want to assign, and click Change Vehicle Assignment (display label shown as "not set").
You may need to filter the Driver List by Driver Group if you don't see the driver you want to modify.

The window refreshes with a list of all vehicles (Step 1).
- Choose the vehicle from the drop-down, and click Assign Vehicle.

The window refreshes with a list of start date options (Step 2).
- Choose the start date option that best applies, and click Select Start. Options include: Current, By Date (last 90 days), or Permanent.
Assigning this permanent driver to another vehicle will remove this driver assignment from driver history.

The window refreshes with a list of end date options (Step 3).
- Choose the end date option that best applies, and click Finish Assignment. Options include: Default and By Date (last 90 days).

A message appears to indicate the assignment was successful. You can now see driver history from the Edit Vehicle Details page for the selected vehicle. Most recent history is shown first. You can also see driver labels for any associated reports and mapping details.

Batch Assignment via Spreadsheet Upload
The portal provides several options for importing and exporting data to and from a spreadsheet. You can use the import option for assigning a large batch of drivers.
To upload driver-to-vehicle mappings using the portal interface:
- From the portal, hover over the Account menu, click Manage Drivers, and then click Update/Export items using a spreadsheet.
- Download one of the CSV Example templates (1, 2, or 3) next to the Assign Drivers spreadsheet action.
- Within the spreadsheet, populate the remaining rows with your own data. Available columns include: VIN, Driver Full Name (or driver reference id or driver last name).
- Save the spreadsheet with your changes.
- From the portal in the Spreadsheet Actions grid, click the Assign Drivers option.
- From the Import Step 1: Upload CSV or Excel File grid, click Choose File.
- In the Open window, browse to the location where you saved the file for import, and double-click it.
- Click Upload Now.
The Import Step 2: Define Columns grid appears. This grid allows you to see how your spreadsheet column names (shown in the drop-downs) will be applied to the appropriate fields in the portal (shown in bold). Set any fields marked "IGNORE" to the appropriate column name.
- Click Preview the Import.
The Import Step 3: Preview Import Data grid appears. This grid allows you to verify the data that will be imported. Valid values for reference fields will be marked with a green check box.
- Click Proceed with Import.
The Import Step 4: Import All Data grid appears. This grid provides a summary of the import results. If any rows were skipped, they will be listed here with the reason they were not imported.
Assignment via SMS
Assignment via SMS allows you to create assignments from your phone (does not require the portal interface). Before using
query services, you must authorize your SMS-enabled device with your account.
To assign a driver to a vehicle using SMS:
- Compose a new text message using the following syntax:
gps [vehicle label] assign [first last, or last, or RefId]
Example: gps TR-150 assign Jesse Lisson
- gps - keyword that must exist in the message
- [vehicle label] - substitute with the vehicle label that identifies the vehicle in the portal.
- assign - keyword that must exist in the message
- [first last] OR [last] OR [RefId] - substitute with the first and last name, last name only, or reference ID of the driver you want to assign.
- Send the message to 477-477 (GPSGPS).
Driver Assignment via Keyfob
After Driver ID readers have been installed in your vehicles, use the following steps to assign a driver to a particular Driver ID keyfob. Each driver is assigned only one keyfob but can swipe in to many vehicles that have a Driver ID reader installed. After a driver has been assigned to a keyfob, he or she can assign themselves to a vehicle by swiping the fob onto the reader.
We offer two keyfob Driver ID solutions:
To assign a driver to a Driver ID keyfob:
- From the portal, hover over the Account menu, click Manage Drivers, and click Assign DriverID keyfobs and activity.
The Manage Drivers Buttons page opens in a new browser tab.
- From the DriverID List grid, click DriverID next to Register New.

- In the Assign Driver Button window, choose the driver to associate with a DriverID.
The DriverIDs are available on your account after the DriverID readers have been installed. If an existing driver or DriverID is not listed, you must delete any existing assignments for that driver or DriverID.
- Click Assign DriverID.

A message appears to indicate the assignment was successful.
The next time Jesse scans his keyfob into a vehicle's Driver ID reader, he will automatically be assigned to that vehicle, and all of his history will be logged to that vehicle until he scans his keyfob into a different vehicle. If Jesse had already been manually assigned to a different vehicle in the portal interface, his keyfob scan overrides the existing assignment.
Assignment via GPS Insight Manager App (iOS | Android)
The GPS Insight Manager app allows you to assign or re-assign a driver to a vehicle from the Vehicle Card on the Map. If a driver is assigned to a vehicle, you can then search for the driver in the app. You may also change a driver assigned to a vehicle. Drivers must be previously added to the Portal to appear in the list of available drivers on the app.
To assign a driver with the iOS GPS Insight Manager App:
- From the vehicle card, tap Assign a Driver.
 A list of available drivers appears.

- Tap on the name of the driver you would like to assign to the vehicle.
The driver is now assigned.
Refer to
Using the iOS Manager Map for additional information.
To assign a driver with the Android GPS Insight Manager App:
- From the vehicle card, tap Assign a Driver.
 A list of available drivers appears.

- Tap on the name of the driver you would like to assign to the vehicle.
The driver is now assigned.
Refer to
Using the Android Manager Map for additional information.
Assignment via the GPS Insight Driver App (iOS | Android)
With the GPS Insight Driver App, drivers can assign and unassign themselves to/from a vehicle from their mobile
iOS and
Android devices.
To assign a driver with the iOS GPS Insight Driver App:
A list will not appear if this is the first time you have logged in to the App or you have not yet assigned any vehicles previously.
- Assign a vehicle using one of the following options:
[row]
[column lg="5" md="12" sm="12" xs="12" ]
- 1- Enter the vehicle ID (associated ID in the Portal) in the text field
- 2- Tap on a vehicle ID from a list of vehicles that you have assigned yourself to previously using the Driver App
- 3- Tap on the QR code* icon to scan with your mobile device
[et]
[/column]
[column lg="7" md="12" sm="12" xs="12" ]
 [/column]
[/row]
If you are using the QR code: The first time you tap on the QR code icon, a prompt appears stating: "'Driver Would Like to Access the Camera." Tap OK to use the QR code to assign a vehicle. If you select Don't Allow, you will not be able to scan the QR code and you are returned to the Vehicle Assignment screen. If you would like to enable camera access to the Driver App at a later time, you can make this change in your phone settings.
*If you would like your drivers to use the QR code scan method, you must have QR stickers created that are unique to each vehicle (associated with VIN or Vehicle ID) and affixed to the vehicle.
- If you have entered a vehicle ID in the text field (Option 1), tap Assign.
You are now assigned to the vehicle.
Refer to
Using the iOS Driver App Driver Assign for additional information.
To assign a driver with the Android GPS Insight Driver App:
A list of vehicle IDs will not appear if this is the first time you have logged in to the App or you have not yet assigned any vehicles previously.
- Assign a vehicle using one of the following options:
[row]
[column lg="5" md="12" sm="12" xs="12" ]
- 1- Enter the vehicle ID (associated ID in the Portal) in the text field.
- 2- Tap on a vehicle ID from a list of vehicles that you have assigned yourself to previously using the Driver App.
[et]
[/column]
[column lg="7" md="12" sm="12" xs="12" ]
 [/column]
[/row]
- If you have entered a vehicle ID in the text field (Option 1), tap Assign.
You are now assigned to the vehicle.
Refer to
Using the Android Driver App Driver Assign for additional information.
Assignment Push via Driveri Visual Login System (VLS)
For driver assignment via Driveri Visual Login System (VLS), assignments are pushed from the Driveri platform to the Fleet Tracking platform.
To enable Driveri Visual Login, the customer account must have the Driveri add-on product and Admin users with Driveri permissions will follow the instructions provided in the
Driveri Visual Login System article and enable the feature from the Driveri Integration page in the Fleet Tracking Portal with the directions below.
Enabling Driveri VLS Driver Assingment Integration
How to enable the Driveri VLS Driver Assingment Integration:
- After logging in to the Fleet Tracking Portal with valid credentials, navigate to the Classic Portal.
 The Classic Portal displays.
- Hover your mouse over or click More.
- From the drop-down menu, click Driveri Cameras then click Vehicle and Driver Integration.
 The Driveri Integration page appears.
- In the Configuration Options section, check the checkbox next to "Sync Driver Assignments".
 The VLS Integration is enabled.
Driveri Visual Login System (VLS) Notes
- VLS today is ~80% accurate to start, but will continue to become more accurate as time goes on with Artificial Intelligence (AI)
- To utilize VLS, drivers will need to record at minimum 40 hours of active and assigned drive time
- Drive time can be assigned manually, through the Driveri app, or using fobs to accomplish this system “training”
- In order to train the system, two or more drivers must be trained in tandem. The system will fail to train on a single driver as it will not have other facial features available for comparison.
- Once the system is trained on the driver, a recommended best practice is for fleet managers to review unassigned drive time on a weekly or monthly basis to ensure drive time and data are assigned correctly and advance AI learning of the system so that future assignments are captured automatically
If users have both ELD and Driveri, then ELD driver assignments will always be reflected in the system.
[post_title] => Assigning a Driver to a Vehicle
[post_excerpt] => After you create a new driver within the portal, you may want to assign that driver to a specific vehicle.
[post_status] => publish
[comment_status] => closed
[ping_status] => closed
[post_password] =>
[post_name] => assigning-a-driver-to-a-vehicle
[to_ping] =>
[pinged] =>
[post_modified] => 2026-02-05 10:44:40
[post_modified_gmt] => 2026-02-05 17:44:40
[post_content_filtered] =>
[post_parent] => 937
[guid] => http://gpsihelp.wpengine.com/?post_type=documentation&p=940
[menu_order] => 4
[post_type] => documentation
[post_mime_type] =>
[comment_count] => 0
[filter] => raw
)
[3] => WP_Post Object
(
[ID] => 1039
[post_author] => 12
[post_date] => 2016-01-28 17:17:38
[post_date_gmt] => 2016-01-28 17:17:38
[post_content] => The Manage Drivers and Groups page provides a comprehensive view of the information for drivers and allows you to edit details. You can also update driver settings by way of spreadsheet import.
Filter the Driver List
If your user list is long, you can use filter options to isolate a subset of drivers.
To filter the driver list:
- From the portal, hover over the Account menu, click Manage Drivers, and click Open.
The Manage Drivers and Groups page opens in a new browser tab.

- Choose from the following filter options:
- Show Deleted: Show only drivers whose records have been deleted from the account.
- Blocked Phone Numbers: Show only drivers who have replied "STOP" to any incoming 477-477 message. (In order to remove a stop request, contact Support.)
- Driver Group: Show only drivers who belong to a selected group.
- Search: Vehicles that match a description. Use * as a wild card before or after a string of characters.
- Show All Select the check box to show all records on a single page (may take more time to load).
- Click Filter.
The driver list shows only the drivers that match your filter criteria.
Edit Driver Details
Editing driver details allows you to modify details about the drivers's profile, such as timezone or email address. The Manage Drivers and Groups page also allows you to manage
driver group membership and
driver assignment.
To edit driver details:
- From the portal, hover over the Account menu, click Manage Drivers, and click Open.
The Manage Drivers and Groups page opens in a new browser tab.
You can also export driver information from the bottom of this page or update user details in a batch process using spreadsheet import.
- Locate the driver you want to modify, and click Edit (
 )
- From the Edit Drivers Details window, add or edit information.
- When finished modifying Drivers details, click Save Changes.
[post_title] => Editing a Driver
[post_excerpt] => The Manage Drivers and Groups page provides a comprehensive view of the information for drivers and allows you to edit details. You can also update driver settings by way of spreadsheet import.
[post_status] => publish
[comment_status] => closed
[ping_status] => closed
[post_password] =>
[post_name] => editing-a-driver
[to_ping] =>
[pinged] =>
[post_modified] => 2019-06-05 12:48:31
[post_modified_gmt] => 2019-06-05 19:48:31
[post_content_filtered] =>
[post_parent] => 937
[guid] => http://gpsihelp.wpengine.com/?post_type=documentation&p=1039
[menu_order] => 2
[post_type] => documentation
[post_mime_type] =>
[comment_count] => 0
[filter] => raw
)
[4] => WP_Post Object
(
[ID] => 22713
[post_author] => 12
[post_date] => 2021-05-12 13:13:52
[post_date_gmt] => 2021-05-12 20:13:52
[post_content] => Drivers remain assigned to vehicles until they manually log out, are manually unassigned, or are reassigned to another vehicle. If you prefer to have drivers automatically logged out nightly, you can do so by selecting the following in the classic Portal:
- Unassign Drivers Nightly – At the end of every workday, the driver will be unassigned from their vehicle.
To enable the Unassign Drivers Nightly feature:
- Navigate to the Legacy Dashboard
- Click the wrench icon (
 ) in the top-right for Dashboard Options
- Check the box labeled Unassign Drivers Nightly
- Confirm the driver unassignment warning pop-up.
- Click Apply at the bottom of the window (The portal will refresh).

- On the main dashboard menu:
- Navigate to Account -> Manage Drivers
- Under Additional Options, click Exempt Drivers from Nightly Unassignment

- On the Manage Nightly Exemptions page
- Selected drivers will not be logged out at the end of each day.
- Select individual drivers from the table with the checkbox on the right side.
- Filter by driver group, Clear All, Exempt All usability features available.

[post_title] => Nightly Driver Unassignment
[post_excerpt] =>
[post_status] => publish
[comment_status] => closed
[ping_status] => closed
[post_password] =>
[post_name] => nightly-driver-unassignment
[to_ping] =>
[pinged] =>
[post_modified] => 2021-05-13 09:48:54
[post_modified_gmt] => 2021-05-13 16:48:54
[post_content_filtered] =>
[post_parent] => 937
[guid] => https://help.gpsinsight.com/?post_type=documentation&p=22713
[menu_order] => 0
[post_type] => documentation
[post_mime_type] =>
[comment_count] => 0
[filter] => raw
)
[5] => WP_Post Object
(
[ID] => 939
[post_author] => 12
[post_date] => 2016-01-26 16:55:17
[post_date_gmt] => 2016-01-26 16:55:17
[post_content] => Driver groups are used to organize the drivers based on logical separations that make sense to your business. Groups allow you to easily filter reports, maps, and dashlets. Groups also as determine which users of your account can view information for certain drivers.
Add Driver Groups
You can create any number of driver groups. For each group you create, you can assign drivers and users to that group. Drivers and users can belong to more than one driver group.
Example
Company XYZ uses trucks to transport large heating/cooling equipment and uses vans for conducting on-site repairs. Drivers that are qualified to operate the trucks are assigned to a "Delivery" group. Drivers that specialize in service are assigned to a "Service" group. Some drivers are qualified to conduct deliveries and make on-site repairs, so they are assigned to both groups. XYZ's owner wants his Service Manager, Tom Jones, to only see drivers that belong to the "Service" group when Tom accesses the portal.
To create a new driver group:
- From the portal, hover over the Account menu, click Manage Drivers, and click Open.
The Manage Drivers and Groups page opens in a new browser tab.
- At the bottom of the Driver Group List grid, click Driver Group next to Create New.

- In the Create New Driver Group window, enter a name for the group.
- Click Create Group.

The window refreshes with a list of all drivers. By default none of your drivers are included in the new group.
- From the right pane (Drivers NOT in the group), click to select the driver(s) to add to the new group. (CTRL+click or SHIFT+click to select more than one driver at a time.)
- Click Add.
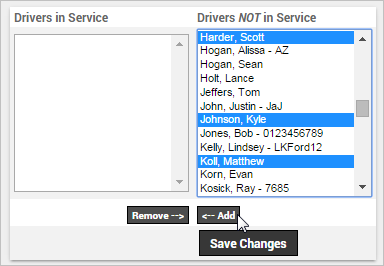
- Click Save Changes.
The window refreshes with a list of all users. By default your username is included in the group.
- From the right pane (Users with NO ACCESS to the group), click to select the users to add to the new group. (CTRL+click or SHIFT+click to select more than one user at a time.)
- Click Add.
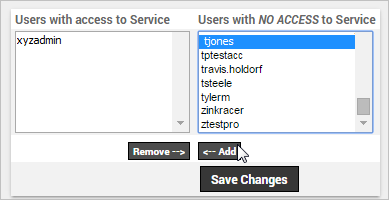
- Click Save Changes and then Close to return to the Manage Drivers and Groups page.
If you skipped a user by mistake, or if you would like to manage user access after the initial setup, you can do so from the Users administration page.
Set Driver Group Membership
Each time you create a new group, you can assign driver(s) and user(s) to that group. If you skipped a driver by mistake during that process, or if you want to quickly update group membership for a specific driver after initial group creation, you can use this process.
To assign or remove a driver to/from one or more groups:
- From the portal, hover over the Account menu, click Manage Drivers, and click Open.
The Manage Drivers and Groups page opens in a new browser tab.
- From the Drivers List grid, locate the driver you want to assign to one or more driver group, and click Assign to Driver Groups (group icon
 ).
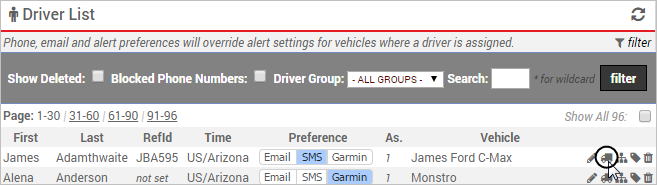
The window refreshes with a list of all driver groups including those groups that are already assigned to the current driver.
- From the right pane (Groups driver is NOT in), CTRL+click to select the driver groups you want to assign to the current driver.
- Click Add. (Or select groups from the left pane and click Remove to un-assign the current driver from groups.)
- Click Save Changes to return to the Manage Drivers and Groups page.
[post_title] => Using Driver Groups
[post_excerpt] => Driver groups are used to organize the drivers based on logical separations that make sense to your business. Groups allow you to easily filter reports, maps, and dashlets. Groups also as determine which users of your account can view information for certain drivers.
[post_status] => publish
[comment_status] => closed
[ping_status] => closed
[post_password] =>
[post_name] => using-driver-groups
[to_ping] =>
[pinged] =>
[post_modified] => 2019-06-05 12:48:38
[post_modified_gmt] => 2019-06-05 19:48:38
[post_content_filtered] =>
[post_parent] => 937
[guid] => http://gpsihelp.wpengine.com/?post_type=documentation&p=939
[menu_order] => 3
[post_type] => documentation
[post_mime_type] =>
[comment_count] => 0
[filter] => raw
)
)
[post_count] => 6
[current_post] => -1
[before_loop] => 1
[in_the_loop] =>
[post] => WP_Post Object
(
[ID] => 937
[post_author] => 12
[post_date] => 2016-01-26 16:54:25
[post_date_gmt] => 2016-01-26 16:54:25
[post_content] => After you've registered vehicles within the [whitelabel_name] portal, you can optionally set up drivers and link them to certain vehicles within your fleet to enhance your reporting and messaging options. It's also a good practice to create driver groups if you plan to limit which users can see data for certain drivers.
You must have the Driver Admin permission enabled in the User Access List in order to manage users.
[post_title] => About Drivers
[post_excerpt] => After you've registered vehicles within the portal, you can you can optionally set up drivers and link them to certain vehicles within your fleet to enhance your reporting and messaging options. It's also a good practice to create driver groups if you plan to limit which users can see data for certain drivers.
[post_status] => publish
[comment_status] => closed
[ping_status] => closed
[post_password] =>
[post_name] => about-drivers
[to_ping] =>
[pinged] =>
[post_modified] => 2019-06-05 12:48:19
[post_modified_gmt] => 2019-06-05 19:48:19
[post_content_filtered] =>
[post_parent] => 0
[guid] => http://gpsihelp.wpengine.com/?post_type=documentation&p=937
[menu_order] => 3
[post_type] => documentation
[post_mime_type] =>
[comment_count] => 0
[filter] => raw
)
[comment_count] => 0
[current_comment] => -1
[found_posts] => 6
[max_num_pages] => 1
[max_num_comment_pages] => 0
[is_single] =>
[is_preview] =>
[is_page] =>
[is_archive] => 1
[is_date] =>
[is_year] =>
[is_month] =>
[is_day] =>
[is_time] =>
[is_author] =>
[is_category] =>
[is_tag] =>
[is_tax] => 1
[is_search] =>
[is_feed] =>
[is_comment_feed] =>
[is_trackback] =>
[is_home] =>
[is_privacy_policy] =>
[is_404] =>
[is_embed] =>
[is_paged] =>
[is_admin] =>
[is_attachment] =>
[is_singular] =>
[is_robots] =>
[is_favicon] =>
[is_sitemap] =>
[is_posts_page] =>
[is_post_type_archive] => 1
[query_vars_hash:WP_Query:private] => b0dda771c81c630cda3ab84bc47edd60
[query_vars_changed:WP_Query:private] => 1
[thumbnails_cached] =>
[allow_query_attachment_by_filename:protected] =>
[stopwords:WP_Query:private] =>
[compat_fields:WP_Query:private] => Array
(
[0] => query_vars_hash
[1] => query_vars_changed
)
[compat_methods:WP_Query:private] => Array
(
[0] => init_query_flags
[1] => parse_tax_query
)
[query_cache_key:WP_Query:private] => wp_query:539f2a80042c3ab1ab8cc97e289012ae
)
[children] => Array
(
)
[term] => WP_Term Object
(
[term_id] => 45
[name] => Drivers
[slug] => driver
[term_group] => 0
[term_taxonomy_id] => 45
[taxonomy] => feature
[description] => Drivers allow you to enhance your reporting and mapping options with driver-centric information. You can assign drivers to vehicles, create driver groups, and create driver attributes.
[parent] => 0
[count] => 8
[filter] => raw
[term_order] => 9
[cat_ID] => 45
[category_count] => 8
[category_description] => Drivers allow you to enhance your reporting and mapping options with driver-centric information. You can assign drivers to vehicles, create driver groups, and create driver attributes.
[cat_name] => Drivers
[category_nicename] => driver
[category_parent] => 0
)
[post_count] => 6
)
)
[video] => Array
(
[45] => Array
(
[posts] => WP_Query Object
(
[query] => Array
(
[orderby] => title
[order] => ASC
[post_type] => video
[posts_per_page] => 999
[tax_query] => Array
(
[0] => Array
(
[taxonomy] => feature
[field] => term_id
[terms] => 45
[include_children] => 1
)
[1] => Array
(
[taxonomy] => solution
[field] => term_id
[terms] => 12
)
[relation] => AND
[2] => Array
(
[taxonomy] => product
[field] => term_id
[terms] => 511
)
)
[meta_query] => Array
(
[0] => Array
(
[key] => _exclude_whitelabel_default
[compare] => NOT EXISTS
)
)
)
[query_vars] => Array
(
[orderby] => title
[order] => ASC
[post_type] => video
[posts_per_page] => 999
[tax_query] => Array
(
[0] => Array
(
[taxonomy] => feature
[field] => term_id
[terms] => 45
[include_children] => 1
)
[1] => Array
(
[taxonomy] => solution
[field] => term_id
[terms] => 12
)
[relation] => AND
[2] => Array
(
[taxonomy] => product
[field] => term_id
[terms] => 511
)
)
[meta_query] => Array
(
[0] => Array
(
[key] => _exclude_whitelabel_default
[compare] => NOT EXISTS
)
)
[error] =>
[m] =>
[p] => 0
[post_parent] =>
[subpost] =>
[subpost_id] =>
[attachment] =>
[attachment_id] => 0
[name] =>
[pagename] =>
[page_id] => 0
[second] =>
[minute] =>
[hour] =>
[day] => 0
[monthnum] => 0
[year] => 0
[w] => 0
[category_name] =>
[tag] =>
[cat] =>
[tag_id] =>
[author] =>
[author_name] =>
[feed] =>
[tb] =>
[paged] => 0
[meta_key] =>
[meta_value] =>
[preview] =>
[s] =>
[sentence] =>
[title] =>
[fields] => all
[menu_order] =>
[embed] =>
[category__in] => Array
(
)
[category__not_in] => Array
(
)
[category__and] => Array
(
)
[post__in] => Array
(
)
[post__not_in] => Array
(
[0] => 14750
[1] => 23436
[2] => 27424
[3] => 27817
[4] => 30225
[5] => 31065
[6] => 31175
[7] => 32017
[8] => 32296
[9] => 32565
[10] => 32605
[11] => 32636
[12] => 33723
[13] => 33737
[14] => 33761
[15] => 34344
[16] => 34459
[17] => 34553
[18] => 34586
[19] => 34590
[20] => 34651
[21] => 34657
[22] => 34659
)
[post_name__in] => Array
(
)
[tag__in] => Array
(
)
[tag__not_in] => Array
(
)
[tag__and] => Array
(
)
[tag_slug__in] => Array
(
)
[tag_slug__and] => Array
(
)
[post_parent__in] => Array
(
)
[post_parent__not_in] => Array
(
)
[author__in] => Array
(
)
[author__not_in] => Array
(
)
[search_columns] => Array
(
)
[ignore_sticky_posts] =>
[suppress_filters] =>
[cache_results] => 1
[update_post_term_cache] => 1
[update_menu_item_cache] =>
[lazy_load_term_meta] => 1
[update_post_meta_cache] => 1
[nopaging] =>
[comments_per_page] => 50
[no_found_rows] =>
[taxonomy] => feature
[term_id] => 45
)
[tax_query] => WP_Tax_Query Object
(
[queries] => Array
(
[0] => Array
(
[taxonomy] => feature
[terms] => Array
(
[0] => 45
)
[field] => term_id
[operator] => IN
[include_children] => 1
)
[1] => Array
(
[taxonomy] => solution
[terms] => Array
(
[0] => 12
)
[field] => term_id
[operator] => IN
[include_children] => 1
)
[relation] => AND
[2] => Array
(
[taxonomy] => product
[terms] => Array
(
[0] => 511
)
[field] => term_id
[operator] => IN
[include_children] => 1
)
)
[relation] => AND
[table_aliases:protected] => Array
(
[0] => wp_term_relationships
[1] => tt1
[2] => tt2
)
[queried_terms] => Array
(
[feature] => Array
(
[terms] => Array
(
[0] => 45
)
[field] => term_id
)
[solution] => Array
(
[terms] => Array
(
[0] => 12
)
[field] => term_id
)
[product] => Array
(
[terms] => Array
(
[0] => 511
)
[field] => term_id
)
)
[primary_table] => wp_posts
[primary_id_column] => ID
)
[meta_query] => WP_Meta_Query Object
(
[queries] => Array
(
[0] => Array
(
[key] => _exclude_whitelabel_default
[compare] => NOT EXISTS
)
[relation] => OR
)
[relation] => AND
[meta_table] => wp_postmeta
[meta_id_column] => post_id
[primary_table] => wp_posts
[primary_id_column] => ID
[table_aliases:protected] => Array
(
[0] => wp_postmeta
)
[clauses:protected] => Array
(
[wp_postmeta] => Array
(
[key] => _exclude_whitelabel_default
[compare] => NOT EXISTS
[compare_key] => =
[alias] => wp_postmeta
[cast] => CHAR
)
)
[has_or_relation:protected] =>
)
[date_query] =>
[request] => SELECT SQL_CALC_FOUND_ROWS wp_posts.ID
FROM wp_posts LEFT JOIN wp_term_relationships ON (wp_posts.ID = wp_term_relationships.object_id) LEFT JOIN wp_term_relationships AS tt1 ON (wp_posts.ID = tt1.object_id) LEFT JOIN wp_term_relationships AS tt2 ON (wp_posts.ID = tt2.object_id) LEFT JOIN wp_postmeta ON ( wp_posts.ID = wp_postmeta.post_id AND wp_postmeta.meta_key = '_exclude_whitelabel_default' )
WHERE 1=1 AND wp_posts.ID NOT IN (14750,23436,27424,27817,30225,31065,31175,32017,32296,32565,32605,32636,33723,33737,33761,34344,34459,34553,34586,34590,34651,34657,34659) AND (
wp_term_relationships.term_taxonomy_id IN (45)
AND
tt1.term_taxonomy_id IN (12)
AND
tt2.term_taxonomy_id IN (511)
) AND (
wp_postmeta.post_id IS NULL
) AND ((wp_posts.post_type = 'video' AND (wp_posts.post_status = 'publish' OR wp_posts.post_status = 'graded' OR wp_posts.post_status = 'not_graded')))
GROUP BY wp_posts.ID
ORDER BY wp_posts.post_title ASC
LIMIT 0, 999
[posts] => Array
(
[0] => WP_Post Object
(
[ID] => 1060
[post_author] => 12
[post_date] => 2016-01-28 19:52:51
[post_date_gmt] => 2016-01-28 19:52:51
[post_content] => After you create a new driver within the portal, you may want to assign that driver to a specific vehicle. Driver assignment allows you to view driver history (assignments of different drivers per vehicle). You can also view driver information on reports and maps, as well as send messages using alerts, SMS Messaging, or Garmin Integration.
Although the portal interface has been updated since this video was recorded, the process has not changed.
[post_title] => Assigning a Driver to a Vehicle
[post_excerpt] => After you create a new driver within the portal, you may want to assign that driver to a specific vehicle.
[post_status] => publish
[comment_status] => closed
[ping_status] => closed
[post_password] =>
[post_name] => assigning-a-driver-to-a-vehicle
[to_ping] =>
[pinged] =>
[post_modified] => 2019-11-21 08:14:17
[post_modified_gmt] => 2019-11-21 15:14:17
[post_content_filtered] =>
[post_parent] => 0
[guid] => http://gpsihelp.wpengine.com/?post_type=video&p=1060
[menu_order] => 0
[post_type] => video
[post_mime_type] =>
[comment_count] => 0
[filter] => raw
)
[1] => WP_Post Object
(
[ID] => 1038
[post_author] => 12
[post_date] => 2016-01-28 17:43:25
[post_date_gmt] => 2016-01-28 17:43:25
[post_content] => Driver groups are used to organize the drivers based on logical separations that make sense to your business. Groups allow you to easily filter reports, maps, and dashlets. Groups also as determine which users of your account can view information for certain drivers.
Although the portal interface has been updated since this video was recorded, the process has not changed.
[post_title] => Using Driver Groups
[post_excerpt] => Driver groups are used to organize the drivers based on logical separations that make sense to your business.
[post_status] => publish
[comment_status] => closed
[ping_status] => closed
[post_password] =>
[post_name] => using-driver-groups
[to_ping] =>
[pinged] =>
[post_modified] => 2019-11-21 08:15:06
[post_modified_gmt] => 2019-11-21 15:15:06
[post_content_filtered] =>
[post_parent] => 0
[guid] => http://gpsihelp.wpengine.com/?post_type=video&p=1038
[menu_order] => 0
[post_type] => video
[post_mime_type] =>
[comment_count] => 0
[filter] => raw
)
)
[post_count] => 2
[current_post] => -1
[before_loop] => 1
[in_the_loop] =>
[post] => WP_Post Object
(
[ID] => 1060
[post_author] => 12
[post_date] => 2016-01-28 19:52:51
[post_date_gmt] => 2016-01-28 19:52:51
[post_content] => After you create a new driver within the portal, you may want to assign that driver to a specific vehicle. Driver assignment allows you to view driver history (assignments of different drivers per vehicle). You can also view driver information on reports and maps, as well as send messages using alerts, SMS Messaging, or Garmin Integration.
Although the portal interface has been updated since this video was recorded, the process has not changed.
[post_title] => Assigning a Driver to a Vehicle
[post_excerpt] => After you create a new driver within the portal, you may want to assign that driver to a specific vehicle.
[post_status] => publish
[comment_status] => closed
[ping_status] => closed
[post_password] =>
[post_name] => assigning-a-driver-to-a-vehicle
[to_ping] =>
[pinged] =>
[post_modified] => 2019-11-21 08:14:17
[post_modified_gmt] => 2019-11-21 15:14:17
[post_content_filtered] =>
[post_parent] => 0
[guid] => http://gpsihelp.wpengine.com/?post_type=video&p=1060
[menu_order] => 0
[post_type] => video
[post_mime_type] =>
[comment_count] => 0
[filter] => raw
)
[comment_count] => 0
[current_comment] => -1
[found_posts] => 2
[max_num_pages] => 1
[max_num_comment_pages] => 0
[is_single] =>
[is_preview] =>
[is_page] =>
[is_archive] => 1
[is_date] =>
[is_year] =>
[is_month] =>
[is_day] =>
[is_time] =>
[is_author] =>
[is_category] =>
[is_tag] =>
[is_tax] => 1
[is_search] =>
[is_feed] =>
[is_comment_feed] =>
[is_trackback] =>
[is_home] =>
[is_privacy_policy] =>
[is_404] =>
[is_embed] =>
[is_paged] =>
[is_admin] =>
[is_attachment] =>
[is_singular] =>
[is_robots] =>
[is_favicon] =>
[is_sitemap] =>
[is_posts_page] =>
[is_post_type_archive] => 1
[query_vars_hash:WP_Query:private] => d2da74416c544a1544f181b63a3ba0f6
[query_vars_changed:WP_Query:private] => 1
[thumbnails_cached] =>
[allow_query_attachment_by_filename:protected] =>
[stopwords:WP_Query:private] =>
[compat_fields:WP_Query:private] => Array
(
[0] => query_vars_hash
[1] => query_vars_changed
)
[compat_methods:WP_Query:private] => Array
(
[0] => init_query_flags
[1] => parse_tax_query
)
[query_cache_key:WP_Query:private] => wp_query:0256fd65f73cf2ef47dcf0ab226414f1
)
[children] => Array
(
)
[term] => WP_Term Object
(
[term_id] => 45
[name] => Drivers
[slug] => driver
[term_group] => 0
[term_taxonomy_id] => 45
[taxonomy] => feature
[description] => Drivers allow you to enhance your reporting and mapping options with driver-centric information. You can assign drivers to vehicles, create driver groups, and create driver attributes.
[parent] => 0
[count] => 8
[filter] => raw
[term_order] => 9
[cat_ID] => 45
[category_count] => 8
[category_description] => Drivers allow you to enhance your reporting and mapping options with driver-centric information. You can assign drivers to vehicles, create driver groups, and create driver attributes.
[cat_name] => Drivers
[category_nicename] => driver
[category_parent] => 0
)
[post_count] => 2
)
)
[bestpractice] => Array
(
)
[deepdive] => Array
(
)
)
)
[GPS Insight DVIR] => Array
(
[Enterprise] => Array
(
[documentation] => Array
(
)
[video] => Array
(
)
[bestpractice] => Array
(
)
[deepdive] => Array
(
)
)
)
[Safety Cameras] => Array
(
[Enterprise] => Array
(
[documentation] => Array
(
)
[video] => Array
(
)
[bestpractice] => Array
(
)
[deepdive] => Array
(
)
)
)
[Drive360] => Array
(
[Enterprise] => Array
(
[documentation] => Array
(
)
[video] => Array
(
)
[bestpractice] => Array
(
)
[deepdive] => Array
(
)
)
)
[Driveri] => Array
(
[Enterprise] => Array
(
[documentation] => Array
(
)
[video] => Array
(
)
[bestpractice] => Array
(
)
[deepdive] => Array
(
)
)
)
[GPS Insight Mobile] => Array
(
[Enterprise] => Array
(
[documentation] => Array
(
)
[video] => Array
(
)
[bestpractice] => Array
(
)
[deepdive] => Array
(
)
)
)
[Manager App] => Array
(
[Enterprise] => Array
(
[documentation] => Array
(
)
[video] => Array
(
)
[bestpractice] => Array
(
)
[deepdive] => Array
(
)
)
)
[Driver App] => Array
(
[Enterprise] => Array
(
[documentation] => Array
(
)
[video] => Array
(
)
[bestpractice] => Array
(
)
[deepdive] => Array
(
)
)
)
[GPSI Connect] => Array
(
[Enterprise] => Array
(
[documentation] => Array
(
)
[video] => Array
(
)
[bestpractice] => Array
(
)
[deepdive] => Array
(
)
)
)
[GPS Insight Hours of Service] => Array
(
[Enterprise] => Array
(
[documentation] => Array
(
)
[video] => Array
(
)
[bestpractice] => Array
(
)
[deepdive] => Array
(
)
)
)
[ELD Complete] => Array
(
[Enterprise] => Array
(
[documentation] => Array
(
)
[video] => Array
(
)
[bestpractice] => Array
(
)
[deepdive] => Array
(
)
)
)
[ELD Connect with Focus] => Array
(
[Enterprise] => Array
(
[documentation] => Array
(
)
[video] => Array
(
)
[bestpractice] => Array
(
)
[deepdive] => Array
(
)
)
)
[ELD Flex] => Array
(
[Enterprise] => Array
(
[documentation] => Array
(
)
[video] => Array
(
)
[bestpractice] => Array
(
)
[deepdive] => Array
(
)
)
)
[AOBRD] => Array
(
[Enterprise] => Array
(
[documentation] => Array
(
)
[video] => Array
(
)
[bestpractice] => Array
(
)
[deepdive] => Array
(
)
)
)
)